After traveling to Bulgaria and Ukraine over the past month and a half (See: A Memorable Pipe Picking Adventure from Colorado to Bulgaria and Ukraine), I’m anxious to get back to the worktable again. This attractive pipe came into my possession in December 2018, when my son, Josiah, saw it in a lot of pipes at an antique shop in St. Louis where he lives. It was quite the find and the price was right. The deal that Josiah proposed was that we split the cost and that his part of the purchase would require that I choose one of the St. Louis Lot of 26 to add to my personal collection as a gift from him. What a deal! The pipe I chose is the huge Churchwarden sitting prominently in the center. The Sabre Fancy Pot now on the worktable is marked with the arrow.  The remainder of these pipes were placed in the For “Pipe Dreamers” ONLY! collection where pipe men and women can commission a pipe that whispers their names 😊, benefitting the Daughters of Bulgaria – helping women and girls who have been trafficked and sexually exploited. One newer pipe man, Ronnie, a family man with 2 younger sons living in Nova Scotia, Canada, heard the whisper. Here is what he wrote to me:
I am still very new to pipes. Late last year my cousin introduced me to the fine art of smoking a pipe and I fell in love instantly. He gave me a simple cob, packaged up a couple different tobaccos, and a wad of pipe cleaners. I’ve never been someone that could relax but found pipe smoking calming in a way few other things in life are. As seems to be my habit, every time a new hobby finds me, I want to get as hands on as possible. This led me down the rabbit hole of building and restoring pipes. Most of my free time as of late has been devoted to learning everything I possibly can about smoking, maintaining, building, and restoring pipes. I actually discovered your site from Steve Laugs site, where I was absolutely smitten by the restoration of the Edelweiss pipe. Reading through your site, particularly your mission statement, I thought commissioning a pipe would be a wonderful contribution and this particular pipe really jumped out at me.
I enjoy so much ‘getting to know’ better those who commission pipes. For me it helps to create the bridge of continuity of passing a pipe on to a new steward. Ronnie is not only a fully engaged family man and getting his feet wet with crafting and restoring pipes, but he also brings home the bacon as a software engineer. The Sabre Fancy Pot that got his attention is a nice-looking pipe and here are the pictures I took when it arrived. 

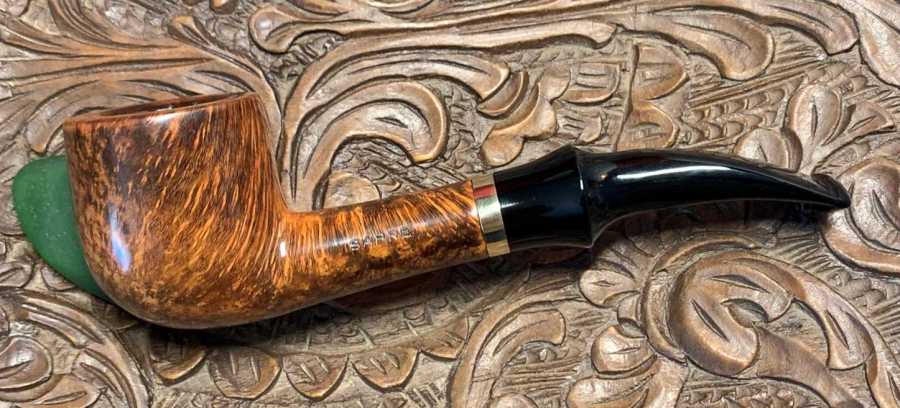
 The nomenclature on the left side of the shank is SABRE with the right side stamped, IMPORTED BRIAR.
 The stamping on the fancy black acrylic stem is a mystery to me and at this point I can only guess – an inverted saber on a surface??
 My plunge into Pipedia resulted in identifying the origins of this pipe. The listing for ‘Sabre’ on Pipedia points to Alpha pipes:
Alpha was originally a brand of the Shalom Pipe Factory in Israel, owned by Bernard Hochstein, former CEO of Mastercraft.
The Alpha line was made exclusively for export to the United States. They were made in Israel from the 1970s into the 1980s, at which point the name was sold to Mastercraft, and later to Lane, Ltd., who produced very few Lane Alpha pipes at the end of the 1990’s. Lane Alphas were sold in five finishes, each denoted with a Greek letter. After Lane, Mastercraft again marketed the Alpha, under the name Alpha USA, with finishes named Sierra, Delta, Mark V, Blue Ridge, Sabre, and Big Boy, some of which were not stamped with the Alpha name.
The listing describing Alpha pipes, originally the Shalom Pipe Factory, was sold to Mastercraft then to Lane then back to Mastercraft. The listing describes ‘Sabre’ as a particular finish when the Alpha name was produced again by Mastercraft after being passed on from Lane, Ltd., in the late 1990s. The identification of Sabre on my worktable as being produced by Mastercraft’s second iteration of Alpha was finding examples of the stem stamping on the Alpha Pipedia page. Here are two comparisons with our pipe in the middle: These examples are of the ‘A’ when Alpha was still produced in Israel, but the style of the ‘A’ stamping was kept through the transitions of ownership. The dating of this pipe is post-later 1990s and was produced by Mastercraft. This is confirmed from the Alpha information in Pipephil.eu:
 The Pipedia Alpha page also had a vintage ad from Mastercraft Pipes, INC., that would be the Alpha USA period of the Sabre on the worktable. The ad shows an example of a Sabre and describes the briar as having a Mediterranean origin.
 With a deeper understanding of and appreciation for the pipe on the table, I take a closer look at its issues. The chamber has moderate cake buildup with lava crusting over the rim. The cake will be removed to allow fresh briar to emerge.
 The briar of the bowl is darkened with a thinning of the finish. The finish is shiny around the shank, but the bowl is dull and listless. There are shadows of a very nice-looking vertical grain underneath the grime. There is a large fill on the upper right side of the bowl. This will need to be addressed.
 The fancy black acrylic stem has some tooth compressions on the upper and lower button lip and the lower bit. There is also tooth chatter on the upper and lower bit. The stem facing is capped with what appears to be a brass spacer/extender. After testing, the ring rotates, but I was not able to remove it. The tenon seems to be enlarged beyond the ring and I don’t want to change the diameter of the tenon. I did establish a small gap that will aid in cleaning. The brass is a touch of class on an attractive fancy stem.
  To begin the restoration of the Alpha Sabre Fancy Pot that Ronnie commissioned, I start with the cleaning of the bowl. I take a fresh picture of the cake build up for comparison. Paper towel is put down to help with the cleanup.
 Using the Pipnet Reaming Kit I start with the smallest blade head and use 3 of the 4 available blades.
 To fine tune the reaming and to reach into the deeper parts of the chamber, the Savinelli Fitsall Tool scrapes the hard-to-reach places and what the reaming tool may have missed.
 The Fitsall Tool also gives an initial scraping over the rim to remove hard crusted lava flow. The rim and chamber cleaning reveals a smart bevel on the inside of the rim.
 The chamber is then sanded with 240 grade sanding paper wrapped around the Sharpie Pen. The Pen provides more leverage as the chamber is sanded.
 A final picture of the arsenal used to remove the carbon cake.
 After wiping the bowl with a cotton pad, an inspection of the chamber reveals healthy briar with no heating or burning problems. Moving on.
 Next, using undiluted Murphy’s Oil Soap, I go to work on cleaning the external bowl surface. I’m hopeful that the cleaning will remove the old, faded, shiny finish around the shank. Using a cotton pad to begin, the briar is scrubbed on the bowl surface and the rim. A brass bristled brush is used as well to work on the rim. A brass brush provides a bit more cleaning muscle without hurting the briar.
 Next, the bowl is transferred to sink and using warm tap water and anti-oil dishwashing liquid, the internal mortise is scrubbed with shank brushes. After scrubbing, the bowl is thoroughly rinsed and brought back to the worktable.
 Continuing with the internal cleaning, pipe cleaners and cotton buds are wetted with isopropyl 99% and used to scrub. Not too far into the effort, a small dental spoon is used to scrape the mortise excavating tars and oils. The more this is done, the less time spent on using the buds and pipe cleaners.
 After some time, the cotton buds start to emerge whiter. I decide to stop at this point in the cleaning with a plan to give the internals a cotton ball/alcohol soak later to help to draw out the tars and oils and to freshen the briar.
 With the primary cleaning on the bowl completed, I take a closer look at the condition of the bowl. The large fill that I noted earlier is tested with a dental probe. The fill is solid but there is some pitting in it.
 The rim has cleaned up but has cuts and scratches. The internal rim bevel needs to be refreshed because it is a bit out of round because of some wear on the forward right side. This most likely is where the former steward drew the flame over the rim when lighting. The rim shows great potential with the vertical grain circling the bowl terminating in the rim with distinctive bird’s eye formations.
 The next few pictures show the ‘speckled’ flecks of old, deteriorated finish on the shank and surrounding area. The underside of the bowl also reveals nice bird’s eye patterns.
 I start first with seeing if the old, thin finish can be removed first using isopropyl 99% alcohol. I use a cotton pad to scrub the briar surface. It continues to clean the bowl, but the shiny finish on the shank can still be seen.
 Next, I use acetone to remove the old finish. The trick here is that I do not want to remove the patina of the briar but the finish on top of it. The acetone works better but I don’t scrub too much with the cotton pad. I leave it for now and will later sand the briar surface to clean it up from the nicks and cuts and hopefully clean up the shank area of the all the old finish
 .Looking next to the fill on the side of the bowl, I use the dental probe to continue digging the old fill material out. The fill material is pretty solid, and it takes a little effort to excavate the area.
 Next, to patch the pit, briar dust is mixed with a small amount of regular CA glue to create a putty. After putting down scotch tape on the plastic mixing disk to help with cleaning, a small drop of glue is placed on the surface next to some briar dust.
 Using a toothpick, a small amount of briar dust is pulled into the glue and mixed with the toothpick. More dust is gradually pulled into the mixture and mixed until it reaches the thickness of molasses. The toothpick is then used to trowel the putty to fill the pit. The bowl is then put aside to allow the patch to fully cure.
 After a time, the patch has cured, and a flat needle file is used to begin clearing the excess patch material to bring the patch down to the surface level of the briar. The goal is to file and sand on top of the patch area so not to have the work area on the briar to large.
 After the filing is completed, folding the 240 grade paper to a point, the patch area is then sanded. The sanding starts with 240 then 600 grade paper.
 The patch looks good for now. I will continue to work on the bowl and the patch should blend in as I go.
 Next, I look at the rim. There is a small area of deteriorating briar on the internal rim edge – over the smart bevel. I take a fresh picture of the rim and the area is marked. The entire rim is rough as well. To clean the rim and reestablish nice lines, the stummel will receive a very light topping along with refreshing the smart internal bevel.
 Using a chopping board and a portable topping board, I use 320 grade paper to begin. After inverting the stummel on the paper, I rotate the stummel several times over the paper with the progression shown.
 I stop at this point with the 320 grade paper.
 Next, the stummel is rotated on the finer 600 grade paper.
 Next, to refresh the internal bevel and to clean the darker burn areas and to round the chamber, using 240 paper with a hard surface pressing behind the paper. This is followed with using 600 grade paper in the same manner. That worked well. The lines are much cleaner now.
 The next step is to clean the bowl surface. To do this, sanding sponges are used. Starting first with a coarser sponge, this is followed by a medium grade sponge then last, a fine grade sponge.
 Continuing the sanding process, the full regimen of micromesh pads is used. Starting with wet sanding, pads 1500 to 2400 are used. This is followed by dry sanding with pads 3200 to 4000 and 6000 to 12000. Wow! The grain on this bowl is distinctive and eye catching. I enjoy watching the grain emerge during the micromesh process.
 With the sanding completed, I continue the internal cleaning process. Using cotton balls and isopropyl 99% alcohol, the internals are further cleaned by drawing the tars and oils out of the briar. A cotton ball is packed into the chamber and another cotton ball is stretched and twisted to form a wick. The ‘wick’ is guided down the mortise and airway to draw the tars and oils.
 After the cotton wick is in place, the chamber is filled with alcohol until it surfaces over the cotton.
 After a few minutes the alcohol is drawn into the cotton and the alcohol is topped and the stummel is set to the side to soak through the night.
 With the stummel on the side, I turn now to the black acrylic fancy stem. I take fresh pictures showing the tooth chatter on the upper and lower bit. The upper button lip is also compressed.
 The lower bit has one deep tooth compression, and the lip has also been chewed.
 Starting with the lower bit that is the most severely damaged, first medium Black CA glue is spot dropped on the deeper compression. The patch is sprayed with an accelerator to quicken the curing and to hold the patch in place.
 Still on the lower bit, a line of Black CA glue is then placed along the button lip to fill the compression. Again, the lip patch is sprayed with an accelerator to quicken the curing and to hold the patch in place.
 After flipping the stem over to the upper bit, a line of Black CA glue is applied in a line along the compression on the upper lip. Again, the patch is sprayed with an accelerator.
 After the patches have cured fully, filing and sanding starts on the acrylic stem. First, the upper lip patch is filed down flush with the surface and then sanded with 240 paper.
 The sanding is expanded to the bit with 240 paper to remove the tooth chatter and then is smoothed further with 600 grade paper.
 The stem is flipped, and a flat needle file is again used to remove the excess patch material used to patch the tooth compression and to fill the compression on the lip. Sanding out the filing scratches follows using 240 grade paper and smoothed further with 600 grade.
 To spruce up the entire stem – remove small scratches and spots, sanding is expanded to the whole stem with 600 grade paper. The brass stem ring is also sanded. The good news is that the stem logo is firmly embedded in the acrylic and is in no danger of erosion.
 Next, the stem is sanded with the full set of 9 micromesh pads. Starting with wet sanding, pads 1500 to 2400 are used. Following this is dry sanding with pads 3200 to 4000 and 6000 to 12000. Between each set of thee pads, Obsidian Oil is applied. I must say, the fancy black acrylic stem came alive during this process and the repairs to the bit are invisible. Nice.
 Next, the acrylic stem is sanded with micromesh pads starting with wet sanding with pads 1500 to 2400. Following this, dry sanding with pads 3200 to 4000 and 6000 to 12000. Between each set of 3 pads Obsidian Oil is applied to the stem. What a transition from where the stem started.
 The next morning, the stummel has been in a cotton ball and alcohol soak to continue cleaning the internals and to freshen the briar for a new steward. The cotton shows signs of soiling having drawn out tars and oils.
 To make sure all the residual gunk is cleaned; I follow up using cotton buds and pipe cleaners wetted with isopropyl 99%. There is more gunk, but soon the buds emerge clean. Job done.
 Next, to deepen the natural hues of the briar and to bring out the grain, Mark Hoover’s excellent product, Before & After Restoration Balm is used. After putting a small amount of the Balm on my finger, the Balm is worked into the briar surface. It starts off with a thicker, wax-like consistency but during the application process it thins to more of a creamy feel. With some Balm residue left on my fingers, I apply some to my LJ Peretti Prince – no Balm goes to waste! The stummels are then set aside for 15 or so minutes to allow the Balm to work.
  After the time has elapsed, I use this dedicated microfiber cloth to buff off the excess balm. The cloth does a great job spreading the goodness with quick buffing of other pipes. The results are great. The rich tones of the natural briar are beautiful.
  The stummel and acrylic stem are reunited to get a bird’s eye look. I like what I’m seeing! Wow! What a sharp looking pipe. The grain is popping and the brass ring transitioning to the fancy acrylic stem is nice.
  With the stem and stummel remaining together, a cotton cloth buffing wheel is mounted onto the rotary tool and speed is set at about 40% full power. Blue Diamond compound is applied to stem and stummel – avoiding the brass ring which requires a different buffing wheel dedicated to metals.
  After the stummel and stem received the Blue Diamond application, the cotton cloth was exchanged for another dedicated to Blue Diamond on metals. The reason for this can be seen on the buffing wheel. It is black. Applying compounds to metals like brass, silver, and nickel, produces a black substance. This substance can stain the briar and make it difficult to clean off. Blue Diamond is applied at the same speed and the fine abrasion does a great job cleaning and bringing out the luster of the polished metal.
  Using a felt rag, the pipe is buffed to remove the remaining compound dust from the surface in preparation for applying the wax.
 Next, to dress up the pipe even more, the Alpha ‘A’ will be refreshed. The pictures that I’ve seen in the online examples have shown the ‘A’ logo imprinted with white coloring. Instead, to tie together the golden brass ring I will use Rub ‘n Buff European Gold to paint the logo. I take a picture to show the starting point.
 Using a toothpick, a very small amount of the paint is applied to the logo. I then use a cotton pad to wipe off the excess.
  Very nice. The logo looks great and complements the gold brass stem ring.
 Another cotton cloth buffing wheel is mounted on the rotary tool set at 40% full power. Next, carnauba wax is applied to the pipe. After completing the wax application, the pipe is given a hearty hand buffing with a microfiber cloth to remove excess wax and to raise the shine.
  I am pleased with the results of this Alpha Sabre Fancy Stem Pot. The grain is beautiful and a huge contrast with the dull, listless finish before. The striking vertical grain culminates on the rim and heel with distinctive bird’s eye grain – the dissection of the vertical grain. The gentle bend of the fancy stem is augmented by the golden brass ring – tying everything together. The ample Pot bowl has a nice feel in the palm assuring good fellowship with one’s favorite blend packed. Ronnie commissioned this Sabre Pot and will have the first opportunity to acquire it in The Pipe Steward Store benefitting the Daughters of Bulgaria. Thanks for joining me!


Wow! Hard to recognize the new version from the old version. A real makeover.
LikeLike
Thanks Todd. I love it when the grain makes an appearance 😊.
LikeLike
What a stunning pipe! Just … wow.
LikeLiked by 1 person
Thanks, Jack! It certainly cleaned up well.
LikeLiked by 1 person
What an amazing result, thank you so much for sharing the ; what is used, the how it’s done. I learn so much from reading about your projects…
LikeLiked by 1 person
Pierre, thank you so much! And I’m so glad that the write ups are helpful to you. That’s why I do it taking the lead from Steve at Rebornpipes 🙂
LikeLike