The next pipe on the table has some sentimental value to me. It came to me in July of 2018 as a gift from a dear friend in Bulgaria. Svetly actually gifted me 3 pipes on this occasion with the bones of one more. A ‘Nelson’ quarter bent Billiard, London England, a Churchwarden Bruyere Garantie, a Savinelli Oscar 102 Italy and the bowl and elbow of a Tyrolean. I took this picture in 2018 when we still lived in Sofia, Bulgaria. These pipes belonged to Svetly’s father and Svetly passed them on to me with the instructions that they could be used to benefit the Daughters of Bulgaria or to keep for myself. Svetly understood well our work helping Bulgarian women and girls who had been trafficked and sexually exploited. CC, his wife, was very much involved with us translating materials from English into Bulgarian for use in our work with the Daughters. And speaking of daughters, Svetly and CC’s daughter, Ellie, lived with my wife and me in Sofia while she studied in the university because Svetly and CC lived at some distance in Plovdiv. The Tyrolean bones went into the box for future projects, and the Nelson and Oscar went into the ‘For “Pipe Dreamers” ONLY!’ online collection for pipe men and women to commission benefitting the Daughters of Bulgaria. However, the Churchwarden found its way into my collection as a special ‘keep-sake’ for me of the family that became a part of our lives in Bulgaria. This picture captures the grain of this elegant Churchwarden after I restored it adding a nice brass ring for some bling.
 The Savinelli Oscar also belonged to Svetly’s father, and this was the second pipe that whispered Justin’s name in the ‘For “Pipe Dreamers” ONLY!’ collection. The first pipe was a Chacom Relief that turned out great. The Chacom is on his way to Justin.
 Justin and his wife live in Florida and quite the renaissance man with numerous aspirations and pursuits. I found out that the Savinelli Oscar now on the worktable was intended to be a gift for his father-in-law, Don, whose birthday is coming up in November. Justin wrote that Don had just earned his MA in Theology, and for Justin, his father-in-law is a very interesting person to talk to about challenging questions that come along. Justin introduced Don to the fine art of pipe a few years ago and whenever they get together, Justin said they enjoy a few bowls over discussions. Another very key element in their relationship is that they try to hunt and fish together as much as possible. Not bad. Justin shared this last thing about his father-in-law that I appreciate: “I really respect his ability to go into any situation with a sense of peace and maintain perspective and likes to share his words of wisdom ‘Nothing is ever as good or as bad as it seems.’”
Here are the pictures of the Savinelli Oscar Justin commissioned for his father-in-law:

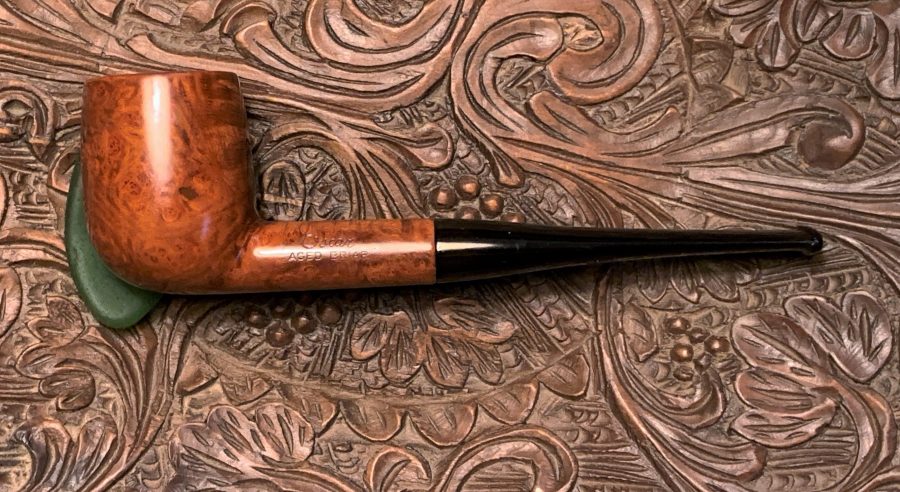
 The Oscar originally sported a metal stinger which was supposed to be able to deliver a cooler, dryer experience. However, the former steward decided, I think with good reason, to snip the stinger to have a clear air flow channel. Most folks I read today are of the opinion that these metal stingers did not deliver the ‘holy grail’, but in fact probably contributed to moisture of condensation.
 The provenance is found on the stamping on both sides of the shank. The left shank flank is stamped with the cursive ‘Oscar’ [over] AGED BRIAR. The right side of the shank is stamped with the traditional Savinelli seal. To its right is stamped the shape number, ‘102’ [over the COM] ITALY.
 I have worked on Savinelli Oscars before and the Oscar is listed as a ‘sub-brand, seconds & order productions’ in the Savinelli Pipedia article. Oscars continue to be produced by Savinelli so I would call Oscar an order production or a line of Savinelli. I personally appreciate the Savinelli name and the quality of pipes that Savinelli has produced over the years beginning in 1876. I enjoyed reading what appeared to be an updated introduction to the ‘Savinelli History’ in the Pipedia article:
 1876 was a year of breakthroughs: Thomas Edison patented the mimeograph, Julius Wolff-Eastport canned sardines for the first time, Alexander Graham Bell made the first telephone call, Pyotr Ilyich Tchaikovsky completed Swan Lake, Melville Bissel patented the first carpet sweeper, Mark Twain published Tom Sawyer, and in Milan, Italy, Achille Savinelli opened one of the first shops exclusively focused on tobacco and smoking accessories.
That last item may seem relatively unimportant in the global scheme of advancements, but for those of us who love pipes, it was a monumental achievement, made even more difficult by the Italian government, which held a monopoly on tobacco. In addition, Achille was convinced that briar pipes represented the future of pipe smoking at a time when the market was dominated by clay and meerschaum. It may not have been obvious in 1876, but Achille Savinelli’s commitment to briar pipes would prove to be visionary.
He soon began designing his own pipes (different from the styling we associate with Savinelli today) and arranged their manufacture by local pipemakers in the Varese district of north-west Italy. The pipes became so popular that some were exhibited at the 1881 Esposizione Industriale Italiana (Italian Industrial Exposition)—the precursor to today’s Milan Fair, one of the largest trade fairs in the world.
I appreciate the collection of photographs that Pipedia displays to better illustrate the articles. The picture below was included in the Savinelli article and is an amazing example of the kinds of pipes that were designed in those earlier days, when the Savinelli production was known primarily as a ‘shop’ business.
 The Pipedia article goes on to describe the family nature of the business and the progression of it generationally. Achille Sr. continued to develop the company for 14 years when the business was passed on to his son, Carlo, who managed the company for the next 50 years. Carlo is described as the one who developed the client base by ‘knowing the customer’ which was primarily centered around their shop in Milan. Carlo’s son, Achille Jr., is described as preferring to stay in the back room tinkering with pipes and design.
World War II came, and Achille Jr. spent 5 years in the military service, but through this experience emerged after the war with a new perspective of how to bring more innovation to the family business which was primarily hinged to local tobacco shops. The following paragraph describes the interesting and challenging period where ‘Italian’ made pipes were considered to be of inferior quality:
As the Second World War began to sweep across Europe, however, Achille Jr.’s experimentation was cut short: he left his beloved workshop for five years of military service, and the experience provided him a new perspective on the role of Italy in the world marketplace. At the time the best-selling pipes in Italy were  made abroad, despite the country’s steadfast reputation for producing the finest quality briar. There were Italian pipe makers, make no mistake, but these workshops and factories seemed to focus on maintaining high production numbers rather than on the quality of the product. For this reason, neither retailers nor customers recognized Italy as a serious exporter of quality briar pipes. Returning from war, Achille Jr. understood that his father’s small shop, though still the principal tobacconist in Milan, could never change this ironic precedent. He knew it would take more than sheer customer loyalty and rapport to shift the pipe making reputation of his country. It would take a superior product, with a unique aesthetic and the capability to withstand high levels of production without sacrificing quality, to shatter the mold. With this in mind, he decided not to return to his father’s shop. He needed to make his own pipes.
So, Achille Jr. set out to carve a new path by starting his own company in the Varese region of Italy, where his grandfather, Achille Sr., had assembled pipe makers that produced the older style of Savinelli pipes. The Pipedia article continues describing the challenges of the startup of ‘Savinelli Pipes’ in 1948:
Savinelli Pipes began production in 1948 and, although the pipes were of a superior quality and unique in their aesthetic, the brand wasn’t an immediate success. Few new brands are. It takes time for the public to catch on. Retailers were skeptical of placing Italian pipes alongside their best sellers from England or France, and customers, in turn, were hesitant to purchase a Savinelli over pipes by already established, foreign brands. Achille Jr. stood by his product, however; he knew it was only a matter of time before the world realized that these pipes were of a far superior quality, capable of competing with even the most well-established pipe manufacturers in the world. As it turns out, he was right. In less than a year, Savinelli pipes gained prestige in markets all across the world—heralded for their delicate balance of innovation and tradition, of form and function. Savinelli pipes were placed alongside the likes of Dunhill and Comoy’s in tobacconists from the United States to Europe, and, in time, this exposure modified Italy’s reputation; it was not only the premier exporter of briar, but now a premium source of fine briar pipes.
 Today, Savinelli Pipes is under the control of Giancarlo Savinelli, Achille Jr.’s son. The history part of the Pipedia article closes with this:
As the current President of the company, Giancarlo has faced a grave challenge: keeping the marque relevant during a period of gradual pipe smoking decline. Pipe smoking may not be as ubiquitous today as in past generations, but Giancarlo has nevertheless energized the family business, much like his grandfather Carlo, by adapting his skills to meet the demands of the customer. By ushering in new lines and series to compete with modern trends, while still maintaining the same strict standards for quality control his father introduced, Giancarlo has preserved the Savinelli legacy—a tradition he will continue to guard until he hands it down, improved, to his son Achille.
One can go to Savinelli’s home page (See: LINK) and peruse the quality of pipes they currently produce. Oscars continue to be a line produced by Savinelli and as the picture below shows, these pipes are not too shabby! All the contemporary examples shown have blasted finishes. They are also adorned with the fancy bands and black acrylic stems. As I admired the Oscar in the picture above, it struck me, what kind of name is ‘Oscar’ for a pipe series? Nothing I have read in the research answers this. A few other basic questions came to mind as well. As I’ve done several times before with other named pipe houses to find information about their pipes, I have simply written them with my questions. I have been amazed at the responses I have received confirming the ‘tight pipe community’ that exists in the world today. I decide to write to the Savinelli contact email listed on the website and ask these questions:
- When was the first production of the Oscar series?
- The shape number of the Oscar is 102. I’ve worked on other Oscars in the past and have found that they do not correspond with Savinelli’s historic shapes chart. Can you shed some light on this?
- What is behind the name, ‘Oscar’? Was it a family member or notable figure? It’s an interesting name for a pipe series.
I was pleased to receive a response from the ‘Savinelli Team’ from their office on Via Achille Savinelli 7, in Brasso, Italy. They asked if I could send them some pictures of the Oscar on the worktable because, “It will be very helpful for us to see the whole pipe, more details you give us more we can tell!” After sending a few pictures, I received this response back from Savinelli about their Oscar line:
Good afternoon Mr. Stanton,
Thank you for your enquiry and your patience. Oscar production started in the ’70s: name sounded good, they decided to apply it for their brand new pipe. 102 shape is an old one we do not use anymore: Oscar was so popular they made in almost every shape we had at that time.
For any further question or information, feel free to write us again,
Kind regards,
Savinelli Team
From this response, I’m able to narrow the origins of the Oscar line to having its genesis in the 1970s, but the only explanation for the ‘Oscar’ name was that it sounded good for their new production line. Sometimes, the answers are not that complicated 😊. I think the name is interesting and definitely unique. The response also describes the wide popularity of the Oscar line with the line being produced in almost every shape. One question did come to mind when I read the information about the shape number. I responded with another question regarding the year in which the shape number 102 was discontinued. If this could be determined, it would bracket further the dating of the 102 on the worktable.
The shape number for this Oscar is 102, but the ‘go-to’ Savinelli shapes chart does not have a 102. Another Oscar I worked on, a bent billiard, also had the same result – the Oscar shape numbers do not seem to line up with Savinelli’s normal shapes or they were discontinued. The well-known Savinelli shape chart pictured below displays their line of various Billiard shapes on the left column. The number skips from 101 to 104. I did a general search for other Savinelli shape charts and nothing I found displayed a 102. I also searched the internet for a ‘Savinelli Oscar 102’ and the only one I found is the one now on the worktable. I’m sure that there is a reason for the lack of a shape 102 and it probably has to do with Oscar being a sub-brand. We’ll see if I can update this when Savinelli responds. I was pleased to see another email from the Savinelli Team not long after in the inbox. Their response to the question about the year the shape number, 102, stopped was:
Thank you for your enquiry,
Unfortunately, a big difference with the past is the technology: we will never know such details!
Fair enough! I have run in to this before. The fact is pipe houses did not give too much concern for what pipe collectors and researchers would be asking decades in the future. They were more concerned about producing quality pipes for the present.
With a renewed appreciation for the Savinelli name and much gratitude to the Savinelli Team for responding to my questions, I take a closer look at the issues of the Savinelli Oscar 102 on the worktable. The pipe is an attractive, classic Billiard shape with a beautiful patch of briar displayed. The patina is dark and rich, and I want to safeguard this. Underneath the nomenclature stamp, Oscar, is stamped, ‘Aged Briar’. I don’t know specifically what this aging specifies, but without doubt, the grain is outstanding. The chamber has mild cake build up and this will be removed to give the briar a fresh start and to inspect for problems. The rim has lava build up mainly on the aft section.  The stummel has at least on fill on the left side. The arrows mark the fills spot. There may be others and we’ll see how the fill weathers the cleaning process. There are also minor scratches over the stummel surface – this is normal wear.
 The stem has some deep oxidation which needs addressing. The chatter on the bit is minor and this should clean up nicely.
 The first step in the restoration of this 70s vintage Savinelli Oscar 102 is to focus on the stem. After wiping the surface, the presence of the oxidation in the vulcanite rises and is more easily seen. Before treating this, the airway is cleaned using several pipe cleaners moistened with isopropyl 99%.
  To get a head jump on the oxidation removal, 000 grade steel wool is used to scrape the stem’s surface. This does a pretty good job.
 Next, the stem is placed on a soak using Briarville.com’s Stem Oxidation Remover. The stem remains in the soak for several hours.
 After the time has elapsed, the stem is fished out of the soak and again 000 grade paper is applied to the stem to remove the raised oxidation.
 Pipe cleaners again are used with isopropyl 99% to clear out the Oxidation Remover fluid from the airway.
 To begin the reconditioning of the vulcanite stem, Paraffin Oil is applied. The stem seems to drink up the oil and it looks good. The stem is set aside for the oil to be absorbed.
 Turning now to the cleaning of the stummel, the first step is to ream the chamber removing the old cake. A picture is taken of the chamber showing an old leaf of baccy and a moderate amount of carbon cake.
  The first step in removing the cake is to ream the chamber using 2 smaller of the 4 blade heads available in the Pipnet Reaming Kit.
  Next, the Savinelli Fitsall Tool fine tunes by scraping the walls and the harder to reach places near the floor and the draft hole.
 Finally, the chamber is sanded using 240 grade paper wrapped around a Sharpie Pen. This gives more reach as well as leverage in sanding.
 After the bowl is wiped with a cotton pad, a quick inspection reveals no problems with heating in the chamber. Moving on.
 Transitioning now to the external cleaning, a fresh picture is taken of the rim to mark the progress.
 Next, undiluted Murphy’s Oil soap is used with a cotton pad to clean the briar surface as well as the rim. The ‘white’ cotton pad shows how much grunge and grime has built up on the stummel.
 The lava flow on the rim proves to be a bit stubborn. A brass wired brush is used to add a bit of muscle to the cleaning without doing damage to the briar.
  The external briar surface has been scrubbed and the next step is to take it to the sink and continue the cleaning on the internals.
 Shank brushes are used with warm to hottish water and liquid anti-oil dish washing soap to scrub. After several minutes of scrubbing the internal mortise and airway, the stummel is thoroughly rinsed with clear water and returned to the worktable.
 Next, to continue with the internal cleaning, pipe cleaners and cotton buds are used and moistened with isopropyl 99% alcohol. A small dental spoon is also used to scrape and excavate the tars and oils that have accumulated on the mortise walls. It’s pretty nasty, but the more that can be excavated in this manner, the fewer cotton buds and pipe cleaners will be used.
 When the buds and cleaners begin to emerge lighter, I call this phase of the internal cleaning process completed. You will notice the fruit of the excavation on the cotton pad. The internal cleaning process will continue at the end of the workday using a cotton ball and alcohol soak.
 Taking and closer look now at the stummel – my oh my. The grain that Savinelli procured for the Oscar is rich and the patina is nice. I had remarked earlier that beneath the ‘Oscar’ is stamped, ‘Aged Briar’. It certainly appears to be.
 The rim came out nicely as well. As often is the case, the charring stain around the rim’s bevel remains after the cleaning. A smart bevel will be re-cut to remove the staining and to refresh the rim’s lines. The rim will also be given a light topping. It will look nice.
 Before moving on with the stummel work, the stem comes back onto the worktable. After the cleaning of the stem, a closer look reveals a small crack on the lower left edge of the button. The pictures below show what I now see. The yellow arrows show the crack’s progression, and the red line shows the end of the crack. In the second picture below, a pipe cleaner was pushed through the airway to see how the crack does if expanded some. You can see that it has expanded a bit with the pipe cleaner inserted.
 Looking at the slot view of the button, the crack wraps around the corner of the slot which means the crack has gone through. It would only be a matter of time if any pressure is placed on the crack that the bit would probably break.
  The approach I will take to repair this crack is first to allow ‘extra thin’ CA glue to seep into the crack and let this cure. This should weld the two sides of the crack together. This will be followed by building a new layer over the button lip, to reinforce the patch. The challenging aspect of using the ‘extra thin’ CA glue is that it is thinner than water and tends to run very easily. Carefully the thin CA glue is applied to crack with a pipe cleaner inserted into the slot to expand the crack. After the CA is in place, the pipe cleaner is withdrawn allowing the crack to tighten helping the bonding process.
 After the patch has cured, 240 paper sands the excess patch material.
 Next, after the sanded area has been cleaned with a cotton pad and alcohol, Black Medium-Thick CA glue is applied over the entire lip to create a new surface.
 After the black CA is applied, the stem is set aside allowing the glue to cure.
 With the day ending, as I mentioned earlier, the internal cleaning will continue by giving the stummel a cotton ball and alcohol soak. Two cotton balls are used. One is pulled and twisted to fashion a cotton ‘wick’ that helps to absorb the tars and oils out of the internal briar. The other cotton ball is stuffed into the chamber.
 The wick is helped down the mortise and airway by a stiff wire.
  The stummel is situated in the egg crate so that the rim and end of the shank are roughly parallel. The chamber is then filled using a large eyedropper with isopropyl 99% alcohol until it surfaces over the cotton. After a while the alcohol is absorbed by the cotton.
 After about 10 minutes, the chamber is again topped off with alcohol and set aside allowing the stummel to soak through the night.
 The next morning, the soak has worked through the night and the cotton ball and wick show the results with the soiling evident. The process draws out the tars and oils from the internal briar.
 To make sure that all is clean, one cotton bud confirms this. A whiff test is also good – the stummel has been refreshed and ready for a new steward.
 The stem has also been sitting overnight and the patch over the button lip is ready to be sanded.
  Starting first with 240 sanding paper, the entire stem is sanded except for the patched button lip. This will await 600 grade paper. To prevent ‘shouldering’ of the stem facing, a plastic disk is used that was fashioned for this purpose. The disk is pinched against the facing and the sanding butts up against the disk. This prevents the sanding off of the sharp edge of the stem facing.
 The sanding commences on the upper and lower sides of the stem with 240 paper.
 This is followed by wet sanding with 600 grade paper. Sanding the button patch is included in this cycle. The reason why this sanding was delayed is that the finer 600 grade paper will not aggressively remove the patch. My experience is that the 600 grade paper also helps to blend the patch better when the goal is to leave a layer over the surface. The wet sanding with 600 paper is followed by applying 0000 grade steel wool to the entire surface.
  Continuing the sanding/polishing process, next the full regimen of micromesh pads is applied starting with wet sanding with pads, 1500, 1800 and 2400. This is then followed by dry sanding with pads 3200, 3600 and 4000. The final cycle is also dry sanding with pads 6000, 8000 and 12000. Between each set of 3 pads, Obsidian Oil is applied to the stem to help to condition the vulcanite as well as to prevent future oxidation. The stem looks great, and I have difficulty discerning where the patched crack is on the lower side of the stem.
 Putting the stem to the side, attention is again on the Savinelli Oscar Aged Briar stummel. Taking a closer look, I’m mesmerized by the grain in this block of ‘Aged Briar’. The bird’s eye grain patterns are robust and clear. The left side of the stummel (first picture below) is where I earlier found a fill. After the cleaning, this fill is solid as a rock, and it took time to find it again. It is marked with an arrow. It will be left alone.
 The rim has ghosts of briar grain trying to peek through, but the scratching and charring stain is an obstacle. The rim needs to be lightly topped and the charring needs to be cleaned. The inner rim lip has a smart bevel which Savinelli included. I like a smart bevel which to me adds a touch of class to an already attractive straight Billiard shape.
 The first step in refreshing the rim is to cut the bevel then the topping will finish off the bevel by sharpening the lines. A top/down picture is taken to mark the progress. The heaviest darkening, as one would expect, is around the back side of the rim, but there is ringing even on the front. To cut the bevel, a wooden sphere is use and strips of 240 paper and 600 paper.
  Starting with the 240 paper, it is wrapped around the sphere and is pinched between the sphere and the inner edge of the rim. The sphere is then rotated around the circumference of the inner rim sanding and creating the fresh bevel. To picture this action, I managed to hold the sphere in place with my left hand so that I can take the picture.
 This picture shows the results of the first cycle with 240 paper.
  The same procedure is employed with 600 grade paper wrapped around the sphere and pinched against and rotated around the inner lip of the rim. This finer paper does a good job of bringing out the grain.
 Looking at the results of the smart beveling, I’m liking what I’m seeing.
 Next, the rim is lightly topped starting with 240 paper. Placing the 240 paper on a chopping board, I now have my portable topping board.
 Only a few rotations of the inverted stummel over the 240 paper were needed.
 After switching the paper to 600 grade paper, several more rotations allow for the grain to come out more distinctly.
 The topping also refreshes the lines around the rim – the inner line that transitions from the bevel to the rim and then the outer rim edge is sharper. To me, this is a thing of beauty to see the rim re-emerge as this one has. To me, if a pipe were to be compared to a person, with a person, the first thing with which the eye makes contact are the eyes of the other person. The rim, seems to me, is the first thing that we ‘see’ when a pipe is before us. Just some musings 😊.
 With the rim completed, the next step is to apply micromesh to the stummel to help erase the small scratches and to sharpen the grain. The first step is to cover the nomenclature on both sides of the shank with painters’ tape. Covering these sections of the briar will undoubtedly leave a darkened footprint as sanding happens around the tape but safeguarding the identity of a pipe is worth a bit of cosmetic sacrifice.
 The first set of micromesh pads from 1500 to 2400 are utilized on the stummel.
 This is followed by using micromesh pads 3200 to 4000 grade. As the sanding graduates to the mid-range micromesh pads, the tape covering the nomenclature is removed. The footprint is vivid comparing the sanded briar to the protected briar. There are ways to mitigate the footprint.
 Using nail polish remover, which is predominantly acetone (I ran out of straight acetone, but polish remover is an acceptable substitute.), the footprints are scrubbed with cotton buds and pads moistened with the polish remover. As the cotton bud in the picture shows, it helps to remove the finish in the footprint.
  The result of using the acetone-based polish remover can be seen in the following picture. The footprint is still visible, but greatly diffused. As the micromesh sanding/polishing continues using the increasingly finer grade pads, this will naturally darken the briar wood as well. Hopefully, at the end of the micromesh process, the darkening briar wood through sanding will align more with the footprint hue and the footprint will not be as intrusive.
 Sanding/polishing commences with micromesh pads 3200 to 4000. The pictures show the results.
 Finally, the last set of pads are employed – pads 60000 to 12000. I’m pleased with the way the grain has emerged and the rich patina is a beautiful thing. The shank footprints are also subdued.
 Almost on the home stretch. Two mini projects are left both involving great products put out by Mark Hoover (www.ibepen.com). The first is ‘Before & After Restoration Balm’ which is applied to the stummel. The restoration balm does a great job bringing out the hues of the natural briar with more distinction. Some of the Balm is placed on the fingers and is worked into the briar surface. The stummel is then set aside for 10 to 15 minutes allowing the Balm to do its rejuvenation. The picture is during this phase.
 While the Balm is working on the stummel, ‘Before & After’ Fine Polish and Extra Fine Polish are used to rejuvenate and enhance the stem. Starting first with the Fine Polish, some is placed on the fingers and thoroughly worked into the vulcanite. The picture below shows the waiting period of about 5 minutes or so. I used a more abrasive paper towel to wipe off the excess Fine Polish and buff the stem up. This is then followed in the same manner by applying Extra Fine Polish to the stem. Another 5 minutes or so, the paper towel is used to wipe and buff up the stem.
 After the process, the vulcanite appears to have ‘sparked up’ a bit as a result of the polishes’ applications. Mark has said that the process not only invigorates the vulcanite stem, but also helps to address residual oxidation.
 The time has elapsed, and the excess Restoration Balm is wiped and buffed off with a microfiber cloth. As expected, the briar hues are eye catching and the Balm has done its job.
 Home stretch – the Savinelli Oscar Aged Briar stem and stummel are reunited. A cotton cloth buffing wheel dedicated to applying Blue Diamond Compound is mounted on the rotary tool. With the speed set at about 40% full power, Blue Diamond compound is applied to the stem and stummel.
 After the compound has been applied, the pipe is buffed with a felt cloth. The purpose of this is to remove the compound dust left behind in preparation for application of the wax.
 After another cotton cloth wheel dedicated to the application of wax is mounted on the rotary tool, with the speed remaining the same, carnauba wax is applied to stem and stummel. When completed, the pipe is given a rigorous hand buffing with a microfiber cloth. This hand buffing removes excess wax and raises the shine.
 When I compare this probable 1970s Savinelli Oscar Aged Briar 102 to the current line of Oscars on Savinelli’s website, there is no doubt the contemporary Oscars are beautiful pipes with some added bling. Yet, looking at the Oscar on the table, I’m seeing a classic, workhorse, Billiard shape. The grain is striking with large, distinctive bird’s eye and swirls and lateral grain contributing to the landscape. The Oscar fits nicely in the palm and promises much fellowship with a steward’s favorite blend in the bowl. Justin commissioned this Savinelli Oscar as a gift for his father-in-law and as the commissioner, has the first opportunity to acquire the Oscar from the Pipe Steward Store benefitting the Daughters of Bulgaria – helping women and girls who have been trafficked and sexually exploited. We start with a before and after to remind us how far we’ve come. Thanks for joining me!


Nicely done, Dal. In particular, I loved that you were able to solicit input from Savinelli … what a delight!
LikeLiked by 1 person
Thanks so much! Yes, I’ve made inquiries like this before and I have been amazed by the responses I have received. Darren, just figured out this was you. Hope all is going well.
LikeLike
Stunning work!
LikeLiked by 1 person
Thanks Jack, appreciate your words. It turned out nicely.
LikeLike
Masterfull work, as always, from what I’ve seen. This article helped me with my own Oscar pipe questions, so thank you for posting it. Your website is greatly appreciated.
Brandon
LikeLiked by 1 person
Thanks, Brandon. I’m glad you’re benefiting from my posts.
LikeLike
Fantastic write up as always! I’ve just picked up my own fresh Oscar 102 and had many of the same questions you had. I greatly appreciate the effort you put in to get us a few answers!
I myself am planning to remove the stinger from the pipe, however I notice a WIDE open airflow and a significant whistling through the pipe after removal. I see in your final images a white bit protruding from the end of the stem. Was this a modification you made to accommodate for the removed stinger or a remnant from the original owner?
Thank you again for the great article!
LikeLiked by 1 person
Actually, I did not remove the stinger on this Oscar. The former steward had snipped it off, leaving behind the metal tube. It does restrict the airflow and I left it in because that’s how I got it. Hope you enjoy your Oscar! Thanks for checking in.
LikeLike